Sunday, September 11, 2016

DIY toddler mannequin


Hi there and welcome to my blog! This post is a tutorial on creating your own toddler mannequin. All of the tutorials I have seen on the internet were not what I was looking for. I have an 18 month old daughter whom I like to make clothes for, but sometimes she is unavailable or uninterested for me to try the clothes on her. There was no way I could make a duct tape mannequin because 1) she won't sit still, and 2) I would never dream of taking scissors to her back! So I had to be creative. And then it hit me, use a footed pajama! The one I used fits her tightly which is perfect because it is pretty true to her body size. 


After I chose the perfect pj's to use, I measured her neck which was 9". I grabbed a paper towel roll and cut a small piece to use as the base for the neck of my mannequin. I then tapped it on to the hanger. 


After that was done I grabbed two burp clothes. I wrapped one around the paper towel roll until it was 9". I then sewed it together. I grabbed the second burp cloth and drapped it on the "neck" and hanger. I sewed the two burp clothes together. 


I put the pj's back on to the hanger and stuffed it with plastic bags. However, I did use cotten balls for the arms because the arms are so thin. I also did NOT sew the arm holes shut but you can if you want. I did not because babies grow so fast who knows how long I'll be able to use this mannequin. When I'm done with it I can simply give the pj's to someone else who needs them. You can stuff the pj's as much or as little as you like depending on your child's body. 

I'm so happy with how it came out :) The best part is that it didn't cost me a dime because I had everything on hand already! I tried on some clothes so you can see how they fit. 


I have my own toddler mannequin! How exciting! 


Thanks so much for checking out my blog! And remember, anyone can DIY, you just have to be willing to give it a try :) 


Wednesday, June 3, 2015

DIY baby pants hangers


Let's be honest, children's pants hangers are bulky and ugly. My daughter's wardrobe is in the open so I didn't want ugly hangers. I couldn't find pants hangers that I liked for her so I made my own :)


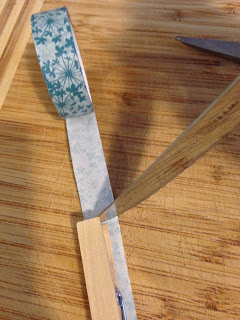
 I purchased these hangers from Walmart.com I added decorative tape to some clothes pins and voilĂ ! Pants hangers! The clothes pins are not permanently attached because I wanted to be able to turn them back into shirt hangers if needed. 

I purchased this decorative tape from walmart. I simply laid the clothes pin down, took a steak knife, and cut the extra tape. No glue needed! 

Thanks for checking out my blog and remember that anyone can DIY...you just have to give it a try. 

DIY shelves

My daughter and I share  a bathroom so room for storage is ideal. I built two shelves to store some items. Altogether each shelf probably cost me around $4-$6. I went to lowes and purchased a long piece of wood and had them cut it for me into four pieces.  


I purchased shelf brackets from Hobby Lobby. I stained the wood with a poly that is also a stain. I predrilled the holes in the walls for the screws.

 The shelf brackets in my sons room were purchase from Walmart. 


 For the shelf in the kitchen I added mug hooks on the bottom to hold more coffee mugs. I also purchased these brackets from hobby lobby.  

Thanks for checking out my blog and remember that anyone can DIY...you just have to give it a try :)

upholstered clock

.

I have a clock in my bathroom that needed updating seeing as Marilyn Monroe is inappropriate for little girls and my daughter and I share my bathroom. I had some left over fabric from another project. 


 I simply traced my clock on the fabric and added two inches to that. I removed the hands from the clock. I hot glued the fabric, replaced the hands and I was done! I think it looks way better than before. 

Thanks for checking out my blog and remember that anyone can DIY...you just have to be willing to give it a try :)

upcycled popcorn tin can


Around Christmas I bought a large tin can full of popcorn for my boys. I had no idea what to do with it when the popcorn was done but I did not want to throw it away. A couple of months later I broke the glass container in which I store my rice. Light bulb! I thought it would be a great idea to store my rice in this large container and it won't break if I drop it! I had leftover fabric from another project (clock project and lamp shade) so I grabbed my hot glue gun and went to town.


As you can see, I did not cover the very top of the can where the lid goes. It would be too hard to put the lid on and take it off as well. When the lid is on you can't even see the snowflakes. 

Thanks for checking out my blog and remember that anyone can DIY...you just have to give it a try :)

Monday, June 1, 2015

DIY chandelier


I wish I had the before photos to show you but I lost a lot of my photos on my computer. 
I purchased everything from Hobby Lobby. I used a small wreath wire which is what everything is attached to. I purchased a gemstone garland in the wedding section and a garland of tiny pearls from the wedding section as well. I cut to size and hot glued the strands to the wire. I added black lace and these flowers with the glue gun. I used the same pearl strands to hang the chandelier with as well. This is hanging over my daughter's changing table. 

DIY girl's hair bow holder


This is a super fast project. I purchased this cardboard letter from Hobby Lobby. Painted it with acrylic paint. Added some flowers with a glue gun and added ribbon with the glue gun as well. That's it! 

Thanks for checking out my blog and remember that anyone can DIY...you just have to give it a try.