Wednesday, June 3, 2015

DIY baby pants hangers


Let's be honest, children's pants hangers are bulky and ugly. My daughter's wardrobe is in the open so I didn't want ugly hangers. I couldn't find pants hangers that I liked for her so I made my own :)


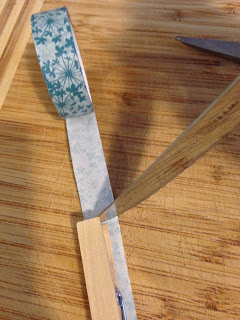
 I purchased these hangers from Walmart.com I added decorative tape to some clothes pins and voilĂ ! Pants hangers! The clothes pins are not permanently attached because I wanted to be able to turn them back into shirt hangers if needed. 

I purchased this decorative tape from walmart. I simply laid the clothes pin down, took a steak knife, and cut the extra tape. No glue needed! 

Thanks for checking out my blog and remember that anyone can DIY...you just have to give it a try. 

DIY shelves

My daughter and I share  a bathroom so room for storage is ideal. I built two shelves to store some items. Altogether each shelf probably cost me around $4-$6. I went to lowes and purchased a long piece of wood and had them cut it for me into four pieces.  


I purchased shelf brackets from Hobby Lobby. I stained the wood with a poly that is also a stain. I predrilled the holes in the walls for the screws.

 The shelf brackets in my sons room were purchase from Walmart. 


 For the shelf in the kitchen I added mug hooks on the bottom to hold more coffee mugs. I also purchased these brackets from hobby lobby.  

Thanks for checking out my blog and remember that anyone can DIY...you just have to give it a try :)

upholstered clock

.

I have a clock in my bathroom that needed updating seeing as Marilyn Monroe is inappropriate for little girls and my daughter and I share my bathroom. I had some left over fabric from another project. 


 I simply traced my clock on the fabric and added two inches to that. I removed the hands from the clock. I hot glued the fabric, replaced the hands and I was done! I think it looks way better than before. 

Thanks for checking out my blog and remember that anyone can DIY...you just have to be willing to give it a try :)

upcycled popcorn tin can


Around Christmas I bought a large tin can full of popcorn for my boys. I had no idea what to do with it when the popcorn was done but I did not want to throw it away. A couple of months later I broke the glass container in which I store my rice. Light bulb! I thought it would be a great idea to store my rice in this large container and it won't break if I drop it! I had leftover fabric from another project (clock project and lamp shade) so I grabbed my hot glue gun and went to town.


As you can see, I did not cover the very top of the can where the lid goes. It would be too hard to put the lid on and take it off as well. When the lid is on you can't even see the snowflakes. 

Thanks for checking out my blog and remember that anyone can DIY...you just have to give it a try :)

Monday, June 1, 2015

DIY chandelier


I wish I had the before photos to show you but I lost a lot of my photos on my computer. 
I purchased everything from Hobby Lobby. I used a small wreath wire which is what everything is attached to. I purchased a gemstone garland in the wedding section and a garland of tiny pearls from the wedding section as well. I cut to size and hot glued the strands to the wire. I added black lace and these flowers with the glue gun. I used the same pearl strands to hang the chandelier with as well. This is hanging over my daughter's changing table. 

DIY girl's hair bow holder


This is a super fast project. I purchased this cardboard letter from Hobby Lobby. Painted it with acrylic paint. Added some flowers with a glue gun and added ribbon with the glue gun as well. That's it! 

Thanks for checking out my blog and remember that anyone can DIY...you just have to give it a try. 


DIY decorative boxes

After photo

In progress

We all have more boxes than we know what to do with. I turned a few of them into decorative storage boxes. I lined the inside with a vinyl adhesive from the dollar tree. 


I wrapped the outside of the box with fabric and burlap from another project. 

 I added these flowers from Hobby Lobby and chalk stickers from Target. 


Fill them and you're done!


These are some boxes I made for my boys room.


I also made a box for the blankets in the living  room when they are not in use.


Thanks for checking out my blog and remember that anyone can DIY...you just have to give it a try. 


DIY space saving hamper


Hampers can sometimes take up space on our floors that we need. I made a hamper for my daughter that is hung on the inside of my closet. I simply used a large sewing loop and pillow case...and that's it! I attached a string to the sewing loop and a nail in the wall which holds up the hamper. 
Thanks for checking out my blog and remember that anyone can DIY...you just have to give it a try. 


Refinished thrift store lamp using coffee filters!!!!


I wanted to make a cute lamp for my daughter since it can be expensive to purchase a new one. 


I found these at a thrift store for $3 a piece. 


I used white coffee filters for the lamp shade. I simply crumpled them and applied with a hot glue gun. This was a bit tedious and time consuming but well worth it. I probably used about 250-300 filters. 


I spray painted the base and decoupaged this image that I printed and aged. 

Thanks for checking out my blog and remember that anyone can DIY...you just have to give it a try :)


DIY shoe shelf

I had a few pieces of scrap wood laying around and needed to do something with them. So I made a shoe shelf for my closet which gave me more room for other things. 

This was such an easy and simple project. I used two candles, napkins, and glue! 


I decoupaged the napkins onto the wood with my own mixture which is equal parts glue and water.

I attached the candles using E6000 glue. 


Thanks for checking out my blog. Remember that anyone can DIY...you just have to give it a try :)


DIY wardrobe


When I found out I was pregnant with my third child, I had to figure out where I was going to put her clothes since all of our closets were full. I decided to turn an old bookshelf into her closet. 


I found this bookshelf at a thrift store for $5.


I then added these pieces of wood that I purchased from Hobby Lobby.


I used a chalk paint that I made and decoupaged this gift wrapping paper to the back.


I added some accents and I was done! 

I purchased these gold tension rods from Walmart. 

I also saved and painted the shelves in case I want to add them later on in the future.

Thanks for checking out my blog. Remember that anyone can DIY, you just have to give it a try!